
Quick Answer: Core Priorities for a Beginner 4-String Bass
Choosing your first bass guitar is an exciting milestone, but the sheer variety of options can easily feel overwhelming. For a beginner, the absolute highest priority should always be playability. A bass that feels comfortable in your hands, features a smooth neck, and has low string action will encourage you to practice daily, whereas a poorly set up instrument will only cause physical frustration.
While high-end electronics and exotic tonewoods look appealing, they are secondary to structural comfort. For a reliable, entry-level 4-string bass that will not hinder your learning progress, expect a budget range of approximately ₱8,000 to ₱15,000 in the local market. At this price point, you can secure a well-constructed instrument with a standard 34-inch scale length, which serves as the universal baseline for learning proper finger placement, fret stretching, and foundational bass techniques.
Evaluating Playability: Neck Profile and Scale Length
The physical dimensions of a bass guitar directly dictate how hard your hands must work to produce a clean note. Before looking at colors or brands, you must understand how scale length and neck shapes affect your physical comfort and overall learning curve.
Products mentioned in this guide

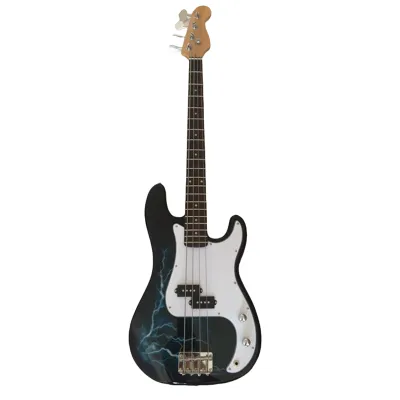



Prices are valid at publication and may change. Please refer to the product page for the latest price.

Scale Length Options
Scale length is the distance between the nut (the slotted piece near the headstock) and the bridge saddles where the strings anchor. This measurement determines both the tension of the strings and the physical distance between the frets.
- Standard Scale (34-inch): This is the industry standard for 4-string basses. It provides a tight, punchy low-end response and excellent string tension. While it requires a bit more finger stretching, learning on a standard scale prepares you to play almost any bass you encounter in the future.
- Short Scale (30-inch to 32-inch): Short-scale basses feature closer fret spacing and lower string tension, making the strings feel looser and easier to press down. This option is highly beneficial for younger players, individuals with smaller hands, or guitarists transitioning to the bass.
Neck Profiles and Nut Width
The neck profile refers to the shape of the back of the neck where your thumb rests. Finding a shape that matches your hand size prevents premature fatigue and cramping during long practice sessions.
- C-Shape Necks: This is the most common modern profile. It features a shallow, rounded curve that fits comfortably in most hands, offering a balanced grip for both technical fretwork and simple groove playing.
- U-Shape Necks: These are chunkier, blockier, and more traditional. They provide excellent support for players with larger hands who prefer to anchor their thumb firmly on the back of the neck.
- Nut Width: The width of the neck at the nut determines how closely the strings are spaced near the headstock. A narrower nut width (around 38mm) makes it much easier to wrap your hand around the neck for quick transitions, while a wider nut width (around 42mm) provides more physical separation between the strings, which can prevent accidental muting.
Checking String Action and Fret Buzz
String action refers to the height of the strings above the fretboard. If the action is too high, you will have to press down incredibly hard to fret a note, leading to hand strain. If the action is too low, the vibrating strings will strike the metal frets, causing an unpleasant metallic rattling known as fret buzz.
When inspecting a bass physically, look down the edge of the neck from the headstock to the body to ensure it has a very slight, healthy curve rather than a dramatic bow. Play every single fret on every string; if you hear persistent buzzing on specific notes, the instrument may require a truss rod adjustment or fret leveling before it is truly playable.
Understanding Pickups and Tone Shaping for Beginners
The pickups are the magnets embedded in the body of the bass directly beneath the strings. They capture the physical vibrations of the metal strings and convert them into an electrical signal. The type and placement of these pickups define the core voice of your instrument.
Precision Bass (P-Style) Pickups
The Precision-style pickup consists of a single split-coil unit. Because the two halves of the pickup are offset and reverse-wound, they naturally cancel out electrical hum while producing a thick, warm, and mid-range-heavy tone.
This configuration is famous for its plug-and-play simplicity. It sits perfectly in almost any musical mix, from classic rock and reggae to pop and indie. If you want a deep, thumping, and reliable foundation without having to fiddle with multiple knobs, a P-style bass is an excellent starting point.
Jazz Bass (J-Style) Pickups
A Jazz-style configuration typically utilizes two separate single-coil pickups: one positioned near the neck and another closer to the bridge. This dual-pickup layout allows you to blend the signals to achieve a wide variety of sounds.
J-style pickups are known for their bright, articulate, and clear tone with a characteristic growl in the mid-to-high frequencies. They are highly favored for funk, jazz, and slap bass techniques. However, because they are true single-coils, they can introduce a slight hum when soloed, which is a normal characteristic of the design.
PJ Configurations and Electronics Choices
For beginners seeking maximum versatility, the PJ configuration combines a P-style split-coil in the neck position with a J-style single-coil at the bridge. This hybrid setup allows you to dial in the warm thump of a Precision bass, the bright bite of a Jazz bass, or a customized blend of both.
Beyond pickup shapes, you must choose between passive and active electronics:
- Passive Electronics: These systems require no external power. They feature simple volume and tone-cut controls. Passive basses are highly reliable, produce a classic organic tone, and never run out of battery mid-performance.
- Active Electronics: These systems utilize an onboard preamp powered by a 9-volt battery. They allow you to actively boost or cut specific frequency bands (bass, midrange, treble) directly from the guitar. While highly versatile, they add complexity and require you to unplug your instrument cable when not playing to prevent draining the battery.
Body Wood, Weight, and Ergonomics
The physical design of the bass body impacts both your physical comfort during long standing sessions and the structural durability of the instrument. Because a bass is significantly larger and heavier than a standard electric guitar, ergonomics should never be overlooked.
Common Beginner Body Woods
Manufacturers use various woods to construct bass bodies, each offering different physical properties:
- Basswood: This is a highly popular choice for entry-level instruments. It is lightweight, which keeps shoulder strain to a minimum, and offers a balanced, neutral tonal profile. However, it is a relatively soft wood that can ding or scratch easily if bumped.
- Alder: A classic tonewood featured on countless legendary recordings. It is moderately weighted, highly durable, and provides a clear, resonant tone with excellent sustain.
- Agathis and Poplar: These are cost-effective, reliable alternatives often found on budget-friendly models. They offer dependable structural stability and a balanced sound without driving up the retail price.
Weight and Physical Balance
A typical bass guitar weighs between 3.6 and 4.5 kilograms. Standing with this weight on your shoulder for an hour-long practice session can quickly cause back and shoulder discomfort if the instrument is poorly balanced.
When testing a bass, wear it on a strap while standing. Release your hands from the neck and observe how the instrument hangs. If the headstock immediately dives toward the floor (a phenomenon known as neck dive), your fretting hand will constantly have to support the weight of the neck while playing, which severely hinders your technique and causes rapid wrist fatigue.
Body Contours
Look for a bass body that features ergonomic contours. A forearm bevel on the front of the body prevents the sharp edge of the wood from digging into your strumming arm. Similarly, a belly cut or ribcage contour on the back of the body allows the instrument to sit flush against your torso, making it feel like an extension of your body rather than an awkward obstacle.
Setting a Realistic Budget and Value Expectations
Navigating the financial aspect of buying your first instrument requires balancing cost against long-term utility. While it is tempting to buy the cheapest option available, ultra-budget instruments often end up costing more in repairs and adjustments than a quality starter bass.
Entry-Level Price Tiers
Understanding what your money buys helps manage expectations and prevents buyer’s remorse:
- Under ₱8,000: In this ultra-budget tier, quality control can be highly inconsistent. You may encounter rough fret edges, cheap plastic nuts, and hardware made of soft metals that strip easily. These instruments almost always require an immediate professional setup to be comfortably playable.
- ₱8,000 to ₱15,000: This is the ideal sweet spot for beginners. Instruments in this range are produced by reputable manufacturers with reliable quality control. You can expect stable neck wood, durable tuning machines, functional electronics, and a level of finish that will easily last several years of active learning.
- ₱15,000 to ₱25,000: This tier offers entry-premium instruments. Here, you benefit from upgraded pickups, smoother fretwork, high-mass bridges for better sustain, and superior wood selection. These basses are fully capable of handling live gigs and studio recording sessions.
The Pitfalls of Unbranded Instruments
Avoid unbranded or generic instruments sold on general online marketplaces. These products often bypass standard quality checks. Common issues include improperly cured neck wood that warps permanently under tropical humidity, misaligned bridges that make correct intonation impossible, and noisy electronics that produce constant buzzing through your amplifier.
Purchasing from Authorized Local Retailers
Buying your first bass from an authorized music store in the Philippines offers immense value. Local stores allow you to physically hold the instrument before committing. Furthermore, established distributors provide official manufacturer warranties and reliable after-sales support, which is crucial if your instrument requires a neck adjustment due to seasonal humidity shifts.
Essential Accessories to Complete Your Starter Rig
Buying the bass guitar itself is only the first step. To practice effectively and protect your investment, you must allocate a portion of your budget for several mandatory accessories.
The Core Amplification Setup
An unplugged electric bass is barely audible. To hear your notes clearly and develop proper dynamics, you need a dedicated bass amplifier. Do not plug a bass into a standard electric guitar amplifier, as the low frequencies can easily tear or blow out the guitar amp’s speaker cone.
For home practice, a compact 15-watt to 40-watt bass amplifier equipped with an 8-inch or 10-inch speaker is perfect. Alternatively, if you live in a shared space or apartment, a high-quality headphone bass amplifier plugs directly into your instrument jack, allowing you to practice silently without disturbing others.
Support and Protection Gear
To connect your bass to your amplifier, invest in a shielded, heavy-duty instrument cable (typically 3 to 5 meters in length) with molded strain relief plugs to prevent signal cutting.
Because of the weight of a bass, a thin guitar strap will quickly dig into your shoulder. Opt for a wide, padded strap (at least 2.5 to 3 inches wide) made of neoprene, heavy cotton, or padded leather to distribute the weight evenly across your collarbone.
Never leave your new instrument leaning against a wall where it can easily slide and crack its headstock. A sturdy A-frame instrument stand keeps your bass safe and accessible. For transportation, a padded gig bag with backpack straps is essential to shield the instrument from tropical rain, dust, and accidental bumps.
Maintenance and Practice Tools
- Clip-On Chromatic Tuner: Bass frequencies can be difficult for cheap phone apps to register. A dedicated clip-on tuner senses the physical vibrations of the wood, allowing you to tune quickly and accurately even in noisy rooms.
- Microfiber Cleaning Cloths: The high humidity and warm temperatures in the Philippines mean your hands will sweat while playing. Wiping down the strings, neck, and hardware with a dry microfiber cloth after every session is vital to prevent premature string corrosion and hardware rusting.
- Professional Setup Budget: If your local music store does not offer a complimentary setup prior to handover, set aside approximately ₱1,000 to ₱2,000 for a professional luthier. A professional will adjust the truss rod, file the nut slots, set the bridge saddle heights, and adjust the intonation, transforming a stiff factory instrument into a dream to play.
Pre-Purchase Inspection Checklist
Whether you are buying in a physical store or unboxing a newly delivered online order, performing a systematic physical inspection ensures you do not end up with a defective instrument.
Step 1: Inspect the Neck and Truss Rod
Hold the bass at eye level and look down the edge of the fretboard from the headstock toward the body. The neck should look straight with a very slight, uniform upward curve. It should not twist or warp to one side.
Locate the truss rod adjustment cavity (usually found at the headstock behind a plastic cover or at the base of the neck where it meets the body). Ensure the adjustment nut is clean, unstripped, and that the adjustment tool fits snugly inside.
Step 2: Test the Tuning Machines
Turn each tuning peg slowly in both directions. The gears should rotate smoothly without catching, slipping, or feeling excessively loose. Check the back of the headstock to ensure all mounting screws holding the tuning machines in place are tight and flush against the wood.
Step 3: Check the Frets and Fretboard
Run your index finger and thumb gently along both sides of the neck. The metal fret ends should feel smooth and flush with the wood. If they feel sharp or stick out (a common issue called fret sprout, caused by wood shrinking in dry or poorly climate-controlled warehouses), they will scratch your hand while playing.
Inspect the fretboard surface for any visible cracks, deep scratches, or gaps where the fretboard glues onto the neck wood.
Step 4: Test the Electronics and Hardware
Plug the bass into an amplifier and turn all the control knobs. The volume and tone pots should rotate smoothly with consistent resistance. If you hear a loud crackling, scratching, or popping sound through the speaker while turning the knobs, the internal potentiometers are dirty or poorly soldered.
Wiggle the instrument cable gently while it is plugged into the output jack. If the sound cuts out or produces loud static, the jack contacts are loose and require adjustment or resoldering.
Frequently Asked Questions (FAQ)
Should I buy a 4-string or 5-string bass as a beginner?
For the vast majority of beginners, a 4-string bass is highly recommended. A 4-string features a narrower neck, which makes it much easier to wrap your hand around and reach all the notes without straining your wrist. The string spacing is also wider, making it simpler to learn clean plucking and slap techniques without accidentally striking adjacent strings.
Additionally, managing string muting is significantly easier on a 4-string. On a 5-string bass, the low B string vibrates sympathetically whenever you play other notes, requiring advanced hand-muting techniques to keep your playing clean. Because almost all beginner instructional books, online tutorials, and standard song tabs are written specifically for 4-string basses, starting with four strings provides the smoothest, most logical learning path.
Does the brand matter for a first bass guitar?
Brand matters primarily because of quality control consistency and resale value. Established, globally recognized manufacturers have strict production standards, meaning even their budget-friendly lines are built to reliable specifications. If you decide to upgrade in the future, a bass from a recognized brand will hold its resale value much better on the secondhand market.
However, lesser-known or local boutique brands can still offer excellent value if they pass a thorough physical inspection. If you have an experienced player or a teacher who can test the instrument with you, a lesser-known brand can sometimes provide upgraded hardware or better wood at a lower price point. Just ensure the purchase is backed by a reputable local distributor who can honor a physical warranty.
Do I need an active or passive bass to start learning?
A passive bass is generally the better choice for a beginner. Passive instruments offer a classic, warm, and highly reliable tone that has defined decades of popular music. They are incredibly simple to operate, usually featuring just a volume knob and a tone knob, which allows you to focus entirely on your finger technique, timing, and rhythm rather than getting distracted by complex equalization settings.
Active basses are excellent tools, but they introduce extra variables. They require a 9-volt battery to function; if the battery dies, your bass will stop producing sound entirely, which can be incredibly frustrating during a practice session or a lesson. For a first-time buyer, the simplicity, lower maintenance, and plug-and-play reliability of a passive bass make it the most practical option.
Community discussion
Share your experience or ask a question. Comments are reviewed before publication.