
To check if a replacement 10 inch drum hoop is compatible with your drum, you must verify more than just the nominal size. While a hoop may be labeled as a “10-inch” model, physical compatibility depends on three critical factors: the exact outer diameter of your drum shell, the number of tension lugs, and the hoop’s physical profile. A mismatch in any of these areas will prevent the drumhead from seating properly, cause tuning instability, or render the hoop completely unusable.
In tropical climates like the Philippines, where high relative humidity can cause wooden drum shells to swell, warp, or expand over time, physical verification is even more vital. You cannot rely solely on the manufacturer’s original specifications or printed labels. By taking a few precise measurements and performing a dry test fit, you can confidently purchase the correct hardware and avoid the hassle of returning incompatible parts to your local or online music retailer.
Tools and Preparation for Measuring Your Drum
Before you begin measuring, gather the necessary tools to ensure accuracy and protect your instrument. You will need a flexible sewing measuring tape, a long metal ruler (at least 12 inches), or a set of digital calipers for precise hardware measurements. Avoid using cheap plastic rulers or rough construction tape measures, as these can scratch your drum’s finish or provide inaccurate readings.
Products mentioned in this guide
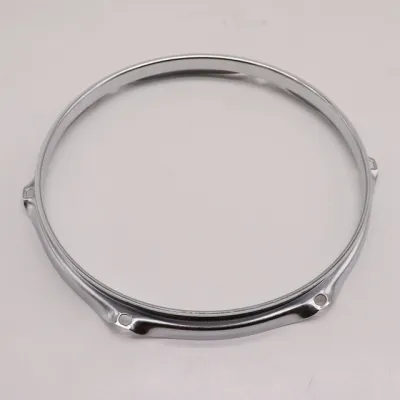
Prices are valid at publication and may change. Please refer to the product page for the latest price.
Start by safely removing the existing drumhead and old hoop. Place the drum on a clean, flat surface padded with a soft towel or a rubber workbench mat to prevent scratches. Use a standard drum key to loosen the tension rods in a cross-pattern, detensioning the head evenly to avoid warping the shell. Once the rods are out, lift off the old hoop and the drumhead.
With the shell exposed, take this opportunity to inspect and clean the drum. Use a dry, clean microfiber cloth to gently wipe down the bearing edge—the thin top rim of the shell where the drumhead rests. Remove any accumulated dust, wax, wood shavings, or debris. In humid environments, moisture can trap dirt along the bearing edge, which can interfere with your measurements and prevent the new drumhead and hoop from seating flat. If you notice any rough spots on a wooden shell, consult the manufacturer’s care instructions before attempting any light sanding or repairs.
Measuring the Drum Shell Diameter and Hoop Size
To confirm the baseline size match, you must measure the physical dimensions of both your drum shell and the new hoop. To measure the outer diameter of your 10-inch drum shell, lay the shell flat on its side or keep it upright on a level table. Place your metal ruler across the very top of the shell, measuring from the outside edge of the wood or metal shell directly across the center to the opposite outside edge.

Repeat this measurement at several different angles—such as from the 12 o’clock to 6 o’clock position, and then from the 9 o’clock to 3 o’clock position. On a perfectly round 10-inch drum, the outer diameter of the shell itself is typically slightly smaller than 10 inches, often measuring around 9.875 inches (9 7/8 inches). If your measurements vary by more than a sixteenth of an inch across different angles, your shell may be slightly out-of-round, which is a common issue with older wood drums exposed to fluctuating humidity.
Next, measure the inner diameter of the replacement 10 inch drum hoop. Lay the hoop flat on a table and measure across the inside of the bottom collar—the part that will slide over the drumhead. You will notice that a hoop designed for a 10-inch shell actually measures slightly larger, usually around 10.125 to 10.5 inches. This extra clearance is a standard sizing convention designed to accommodate the flesh hoop (the outer collar) of the drumhead.
Never rely solely on the printed size label on the packaging or the manufacturer’s website description. Different brands may use slightly different tolerances, and some vintage drums feature non-standard shells that require specialized hoops. Physically measuring both components ensures you do not end up with a hoop that is too tight to slip over the drumhead or so loose that it sits off-center.
Verifying Lug Count and Hole Spacing
Even if the diameter is perfect, a replacement hoop is useless if the tension rod holes do not align with the lugs mounted on your drum shell. The first step in verifying alignment is to count the lugs on your 10-inch drum. For a 10-inch tom, the most common configurations are 5-lug, 6-lug, or 8-lug patterns.
You must count the corresponding holes on the replacement hoop to ensure an exact numerical match. A 6-hole hoop will not fit a 5-lug drum, as the spacing between the holes is mathematically different. For example, a 6-lug hoop distributes holes every 60 degrees around the perimeter, while a 5-lug hoop distributes them every 72 degrees. Attempting to force a mismatched hoop will bend your tension rods and damage the lug casings.
If you are mixing brands or replacing vintage hardware, you must also measure the center-to-center hole spacing. Using your digital calipers or a precise ruler, measure the distance between the center of one tension rod hole on the hoop to the center of the adjacent hole. Compare this to the distance between the centers of the receiving holes on your drum’s lugs.
Be aware of the risk of proprietary or non-standard lug patterns. While most modern drum manufacturers adhere to standard universal spacing, some boutique, vintage, or entry-level brands use proprietary configurations. If your drum features an unusual lug placement, standard aftermarket hoops may not line up, requiring you to source an original replacement part directly from the brand or a specialized vintage hardware dealer.
Checking Hoop Type and Edge Profile Compatibility
The physical shape, material, and profile of the hoop must suit your drum’s bearing edge and your specific tuning goals. Replacement hoops for a 10-inch drum are generally available in three main types, each with unique fit and performance characteristics:
- Triple-Flanged Hoops: These are the most common steel hoops, featuring a rolled top edge. They offer excellent flexibility, making them highly forgiving on slightly uneven shells, and they allow a 10-inch tom to resonate freely with a wide tuning range. Standard triple-flanged hoops are generally affordable, ranging from ₱500 to ₱1,200 in the local market.
- Die-Cast Hoops: Made from molten zinc or aluminum poured into a mold, these hoops are incredibly rigid and heavy. They provide exceptionally consistent tension and sharp rimshots, but their rigidity means they require a perfectly flat, round drum shell to seat correctly. Premium die-cast options typically cost between ₱1,500 and ₱3,500.
- Wood Hoops: Crafted from maple or other hardwoods, these hoops offer a warm, organic tone and distinct cross-stick sounds. However, they are significantly thicker than metal hoops, which may require longer tension rods and can crowd the space on a compact 10-inch drum setup.
Before choosing a hoop type, inspect your drum’s bearing edge for flatness. Place the bare shell on a flat surface, such as a piece of plate glass or a level stone countertop, and look for any gaps where light shines through. If your bearing edge is uneven or heavily rounded, installing a rigid die-cast hoop can choke the drum’s resonance, make tuning extremely difficult, or even damage the wood. A flexible triple-flanged hoop is usually a safer, more compatible choice for older or slightly warped shells.
Test Fitting and Final Verification Steps
Once you have verified the measurements and selected your hoop, perform a safe, reversible physical test fit before fully tightening any hardware. Place a compatible 10-inch drumhead onto the clean bearing edge of the shell, ensuring it sits flat and centered. Carefully lower the new 10 inch drum hoop over the drumhead collar.
Next, insert all the tension rods into the hoop holes and thread them into the lugs by hand. Always start this process finger-tight. Do not use a drum key or any power tools at this stage. Threading the rods by hand allows you to feel the resistance and ensures you do not cross-thread the delicate threads inside the lug nuts.
As you turn the rods, watch for clear “stop and reassess” conditions:
- Resistance or Binding: If a tension rod becomes difficult to turn after only one or two rotations, stop immediately. This indicates misalignment, a mismatched thread pitch, or cross-threading.
- Uneven Seating: If the hoop tilts to one side or sits visibly crooked on the drumhead, remove the rods and check if the drumhead or the hoop is warped.
- Forced Angles: If a tension rod must bend or lean inward to reach the lug, the hole spacing on the hoop is incorrect for your drum's lug placement.
If any of these issues occur, do not force the rods with a drum key, as this can strip the threads or crack the lug casing. Finally, perform a visual check around the entire circumference of the drum. The hoop should be perfectly centered, with an even gap between the inner edge of the hoop and the outer edge of the drumhead collar all the way around.
Frequently Asked Questions (FAQ)
Can I use a 10-inch hoop on a 10-inch tom from a different brand?
Yes, but only if the lug count and hole spacing match perfectly. While the nominal 10-inch diameter is standardized across most modern drum manufacturers, different brands design their drums with varying numbers of lugs (typically 5, 6, or 8 on a 10-inch tom). Always count your drum’s lugs and check the hoop’s hole pattern before attempting to swap hoops between different brands.
What is the difference between die-cast and triple-flanged hoops for a 10-inch drum?
Die-cast hoops are heavy, rigid, and cast from a single mold, providing focused tone, shorter sustain, and extremely stable tuning, though they require a perfectly flat bearing edge. Triple-flanged hoops are made from stamped steel, offering more flexibility, longer sustain, and a more open, resonant sound. On a small 10-inch drum, die-cast hoops can sometimes choke the natural resonance, whereas triple-flanged hoops allow the small shell to vibrate more freely.
Why does my new 10 inch drum hoop measure larger than 10 inches?
This is completely normal. A drum hoop must have a slightly larger physical inner diameter (usually around 10.125 to 10.5 inches) to fit over the outer flesh hoop of a standard 10-inch drumhead. If the hoop measured exactly 10 inches, it would sit directly on top of the drumhead collar rather than sliding down to apply even tension across the head.
Community discussion
Share your experience or ask a question. Comments are reviewed before publication.