
Finding the right acoustic amplifier requires balancing your performance environment, portability needs, and technical requirements. For acoustic-electric players, a dedicated acoustic amplifier is designed to reproduce the natural, uncolored voice of the instrument, unlike traditional electric guitar amps. Whether you are navigating the humid, open-air cafe gigs of the Philippines, practicing quietly in a residential condo, or tracking clean signals in a home studio, selecting the right setup depends on matching specific amplifier features to your primary playing scenario. By evaluating key specifications such as wattage, channel configurations, and direct-out capabilities, you can find a versatile solution that preserves your acoustic tone across any setting.
Quick Guide: Matching Amplifier Specs to Your Primary Scenario
Before diving into specific models, it is essential to understand how technical specifications translate to real-world performance. The primary factors to consider are wattage, speaker size, channel count, and connectivity options.
For home practice, a compact amplifier ranging from 30 to 60 watts with a 6.5-inch speaker is generally sufficient to deliver clear, full-range sound at lower volumes. Small gigs in intimate venues or outdoor spaces typically require 60 to 120 watts, paired with an 8-inch or larger speaker, to provide enough clean headroom to cut through ambient noise without distorting.
Products mentioned in this guide
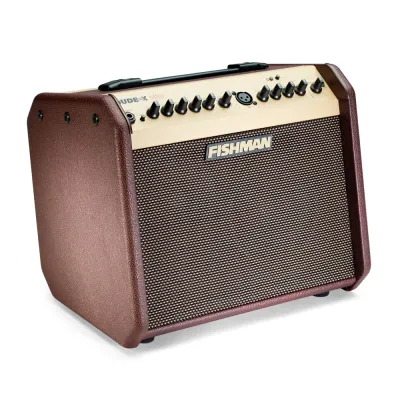
Prices are valid at publication and may change. Please refer to the product page for the latest price.
Solo performers who sing and play simultaneously need at least a dual-channel amplifier with independent EQ controls. If you only play instrumental sets or use an external mixer, a single-channel unit may suffice.
Gigging musicians should prioritize balanced XLR direct outputs (DI out) to connect directly to a venue’s public address (PA) system. For practice, look for auxiliary inputs or Bluetooth connectivity to stream backing tracks. Studio players will want to verify pre/post EQ routing options for their recording interfaces.
Small Gigs: Prioritizing Portability and Stage Projection
Playing live in small venues, outdoor markets, or local cafes presents unique acoustic challenges. In these environments, your amplifier must serve as both your primary monitor and your main sound projection source.

To achieve adequate volume without triggering harsh acoustic feedback, look for an amplifier that offers high clean headroom. This is achieved through efficient power design and matching speaker configurations. Built-in feedback suppression tools, such as phase switches and sweepable notch filters, are critical. These controls allow you to target and eliminate the specific frequencies that cause howling when your guitar’s top vibrates in response to the speaker.
Transporting gear through busy streets or tropical weather requires a lightweight, durable design. Evaluate the physical dimensions, weight, and handle ergonomics of the amplifier. Models weighing under 10 kilograms are highly desirable for solo musicians on the move. Additionally, because high humidity in tropical climates like the Philippines can affect wooden cabinets and electronic components over time, look for robust cabinet construction, protective corner guards, and high-quality vinyl coverings.
Many small gig venues lack proper acoustic treatment, leading to muddy bass or harsh treble. Having a responsive three-band equalizer (EQ) on each channel allows you to adjust your tone to suit the room’s natural acoustics, ensuring your guitar sounds natural and articulate.
Home Practice: Focusing on Tone Shaping and Low-Volume Clarity
When practicing at home, the goal is to maintain a rich, inspiring acoustic tone without disturbing family members or neighbors.
Standard amplifiers can lose their low-end warmth and high-end clarity when turned down to whisper-quiet levels. Look for amplifiers designed with high-fidelity tweeters and specialized preamps that maintain a balanced frequency response even at low master volume settings.
Modern practice setups benefit greatly from connectivity features. Bluetooth integration or a standard 3.5mm auxiliary input allows you to play along with backing tracks, metronomes, or instructional videos directly from your smartphone or tablet. A dedicated headphone output is also essential for late-night practice sessions, disabling the main speaker while routing a simulated stereo signal to your headphones.
Having high-quality onboard effects like reverb, chorus, and delay reduces the need to set up a complex external pedalboard for casual practice. A touch of hall reverb can simulate the acoustic space of a larger room, making dry piezo pickups sound much more natural and pleasant during long practice sessions.
Studio Recording: Ensuring Signal Purity and Direct Integration
Capturing the true essence of an acoustic guitar in a recording environment requires clean signal paths and flexible routing options.
A high-quality balanced XLR direct output is crucial for studio integration. This allows you to send a low-impedance signal directly to your audio interface or mixing console without picking up unwanted electromagnetic interference. Verify if the amplifier features a pre/post EQ switch. A “pre-EQ” setting sends the raw, unaffected signal of your pickup to the interface, allowing you to apply EQ and effects during the mixing stage. A “post-EQ” setting sends your customized amplifier tone directly to the track.
The amplifier’s internal preamp must have a low noise floor to prevent hissing or humming from ruining quiet acoustic passages. When recording, you can choose to record the DI signal directly, place a condenser microphone in front of the physical speaker cabinet, or blend both signals for a richer stereo image.
If you plan to use a high-quality condenser microphone for your vocals or instrument through the amplifier’s second channel, ensure the amplifier provides switchable phantom power to power the microphone capsule.
Cross-Scenario Compatibility: Evaluating All-in-One Solutions
For many musicians, purchasing separate amplifiers for practicing, gigging, and recording is neither practical nor budget-friendly. Finding a single, versatile amplifier that bridges these scenarios requires careful evaluation of trade-offs.
A high-wattage, multi-channel amplifier can easily handle small gigs and studio recording, but it may be heavier to transport and unnecessarily loud for a small bedroom. Conversely, an ultra-portable practice amp might sound excellent at home but lack the projection and connectivity needed for a noisy cafe gig.
When planning your purchase in Philippine Pesos (₱), compare the cost of a single mid-tier, multi-channel amplifier against the combined cost of a dedicated practice amp and an external DI box. Investing in a single, high-quality versatile unit often yields better long-term value and simplifies your gear setup.
If you choose a smaller practice amplifier, you can still adapt it for larger live performances by using an external DI box. This allows you to send your guitar signal directly to the venue’s PA system while using your small amplifier as a personal stage monitor.
Before making your final decision, verify the warranty terms and the availability of authorized service centers in the Philippines. Electronic musical instruments can be sensitive to voltage fluctuations and high humidity, making reliable local technical support and official parts availability crucial for protecting your investment.
Frequently Asked Questions (FAQ)
Do I need a dedicated acoustic amplifier for an acoustic-electric guitar?
Yes, dedicated acoustic amplifiers are designed with a flat, full-range frequency response and include specialized high-frequency tweeters to accurately reproduce the natural tone of acoustic instruments. Standard electric guitar amplifiers are voiced to color the sound, focusing heavily on mid-range frequencies and lacking the high-end clarity required for acoustic piezo pickups, which can result in a muddy or unnaturally harsh tone.
How do I prevent feedback when playing live with a Fishman amplifier?
To minimize feedback during live performances, position your amplifier slightly to the side or in front of you rather than directly behind your acoustic guitar’s soundhole. Utilize the amplifier’s built-in phase switch, which reverses the polarity of the signal and can instantly cancel out feedback loops. For persistent low-end rumble, adjust the notch filter or slightly roll off the bass frequencies on your channel EQ.
Can I use a Fishman amplifier for vocals and instruments simultaneously?
Yes, many multi-channel acoustic amplifiers are designed specifically for this purpose. They feature dedicated microphone inputs with XLR connections, independent volume and EQ controls, and built-in phantom power for condenser microphones. When using a single amplifier for both vocals and guitar, ensure the total wattage is sufficient to handle both signals without clipping, allowing both your voice and your instrument to remain clear and distinct.
Community discussion
Share your experience or ask a question. Comments are reviewed before publication.