
When selecting a drum shield, the choice between acrylic and polycarbonate panels fundamentally shapes your stage volume control, transport logistics, and long-term maintenance. While both materials serve the primary function of deflecting high-frequency sound, they differ significantly in impact resistance, weight, and optical clarity. Because exact decibel reduction and scratch thresholds depend heavily on specific manufacturing processes, panel thickness, and surface coatings, this guide focuses on observable material traits, hardware compatibility, and practical setup conditions. Use these comparisons to align your material choice with your specific gigging frequency, venue requirements, and budget.
In busy live performance environments, managing stage volume is a constant challenge for sound engineers and musicians alike. Drum shields offer a practical physical barrier that helps isolate loud acoustic drums from sensitive vocal microphones. By understanding how acrylic and polycarbonate behave under real-world conditions, you can make an informed investment that improves your overall sound quality without introducing unnecessary transport or maintenance headaches.
Core Differences in Sound Isolation and Acoustic Transparency
Drum shields do not absorb sound waves; instead, they act as reflective barriers that redirect acoustic energy. When a drummer strikes a snare or crashes a cymbal, the high-frequency sound waves travel outward and strike the hard surface of the shield. Rather than passing directly through to the audience or nearby microphones, these sharp frequencies are deflected backward and upward, effectively containing the loudest elements of the kit.
Products mentioned in this guide
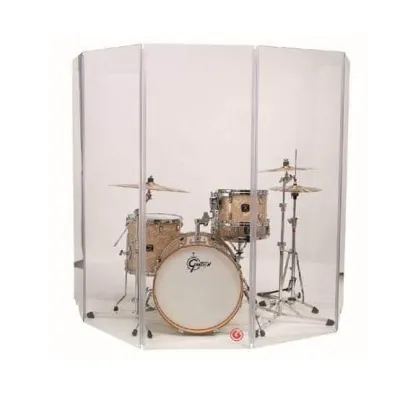
Prices are valid at publication and may change. Please refer to the product page for the latest price.
Acrylic panels are highly rigid, which makes them excellent reflectors of high-frequency sound. This rigidity ensures that sound waves bounce off the surface cleanly, providing a sharp reduction in direct high-frequency bleed. Polycarbonate, while slightly more flexible, offers a very similar acoustic profile in practical stage settings. Because both materials primarily reflect sound rather than absorbing it, the perceived difference in sound isolation between them is often minimal to the casual listener, provided the panels are of equal thickness.
To verify the actual sound isolation performance of a specific drum shield, you should check the manufacturer’s specifications for Sound Transmission Class (STC) ratings or tested decibel reduction data. Relying solely on the material name can be misleading, as manufacturing quality and panel design vary. A higher STC rating indicates a greater ability to block sound transmission through the material itself, which is crucial if you are trying to isolate the drums in a tight studio space.
Panel thickness plays a decisive role in overall sound attenuation for both acrylic and polycarbonate. Thicker panels possess more mass, allowing them to block a wider range of frequencies, including some upper-midrange tones. However, to achieve true sound control, many setups combine these plastic panels with acoustic foam treatments placed strategically along the bottom or back of the shield. This foam helps absorb the reflected sound waves, preventing them from bouncing back into the drum microphones and causing muddy overhead mixes.
Durability, Scratch Resistance, and Long-Term Maintenance
Physical durability is where acrylic and polycarbonate diverge most dramatically. Polycarbonate is renowned for its exceptional impact resistance and flexibility, making it virtually shatterproof under normal stage conditions. It can withstand accidental drops, bumps from heavy hardware stands, and the general chaos of load-ins without cracking. Acrylic, by contrast, is much more rigid and brittle; a sharp impact or a fall onto a hard concrete floor can cause an acrylic panel to chip, crack, or shatter completely.

While polycarbonate wins on impact resistance, acrylic holds an advantage in natural scratch resistance. Standard polycarbonate has a softer surface that scratches relatively easily during transport or cleaning if handled roughly. To combat this, some manufacturers apply specialized hard coatings or scratch-resistant finishes to polycarbonate panels, though this typically increases the cost. Acrylic remains clearer for longer under careful handling, but it is still susceptible to fine hairline scratches over time.
Maintaining optical clarity requires regular, careful inspection and proper cleaning techniques. You should routinely check your panels for signs of wear, clouding, or stress fractures, particularly around the hinge holes and clamp attachment points where physical stress is concentrated. In humid tropical environments, dust, sweat, and condensation can quickly build up on the panels, making regular cleaning essential to preserve stage visibility.
To clean either material safely, always use a clean, ultra-soft microfiber cloth and a mild, non-abrasive soap solution. Avoid using harsh chemical cleaners, glass sprays, or ammonia-based products, as these can cause acrylic to develop tiny surface cracks—a process known as crazing—and cause polycarbonate to turn permanently cloudy. Always consult your product manual for a list of approved cleaning agents to ensure you do not inadvertently void your warranty or damage the panels.
Weight, Portability, and Hardware Compatibility
When comparing panels of identical thickness, polycarbonate is slightly lighter than acrylic, though the difference is often subtle. However, when dealing with a full five-panel or six-panel system, even a minor weight difference per panel accumulates. For mobile setups, a lighter overall shield reduces physical strain during setup and teardown, making it a highly practical choice for gigging drummers.
Overall shield weight directly influences the stability of your stage setup and the type of hardware required. Heavy panels place significant stress on the flexible hinges, clamps, and support bases that hold the system together. If your panels are too heavy for your hardware, the shield may sag, drift, or even tip over during an energetic performance. Ensuring your hardware is robust enough to support the weight of your chosen panels is critical for stage safety.
Before upgrading your panels or switching materials, verify the load capacity and joint compatibility of your existing drum shield hardware. Some heavy-duty chrome clamps and tight-grip hinges are designed specifically for thicker, heavier acrylic panels, while lightweight flexible living hinges might perform better with lighter polycarbonate options. Mixing incompatible hardware and panels can lead to slippage and potential damage during a performance.
For touring musicians, portability extends beyond the stage to transport logistics. You must evaluate the physical dimensions of the folded shield and ensure it fits comfortably into your vehicle’s trunk or gear pack. Because polycarbonate is highly impact-resistant, it is much more forgiving when packed tightly alongside heavy hardware cases, whereas acrylic panels require dedicated padded carrying bags or flight cases to prevent catastrophic cracking during transit.
Budget and Value: Evaluating Costs in the Philippines
In the Philippine market, budget considerations often play a primary role in the decision-making process. Acrylic drum shields are generally more accessible and widely available through local music stores and online marketplaces, with entry-level systems typically starting around ₱12,000 to ₱25,000. Polycarbonate drum shields represent a premium tier, often costing significantly more due to the specialized manufacturing processes required to produce optical-grade, impact-resistant sheets.
The final cost of any drum shield setup is heavily influenced by several configuration choices. Opting for thicker panels (such as 1/4-inch instead of 3/16-inch) increases the price, as does adding more panels to accommodate larger drum kits. Furthermore, packages that include specialized hardware, heavy-duty flexible hinges, or custom-fit padded carrying cases will carry a higher initial price tag but offer better out-of-the-box utility.
When evaluating long-term value, it is important to look beyond the upfront purchase price and consider your specific operational environment. For a touring band or a mobile church ministry that frequently packs and moves gear across different venues, the durability of polycarbonate can prevent costly panel replacements, making it the more economical choice over time. Conversely, for a permanent installation where the shield remains stationary, a more affordable acrylic system offers excellent performance and clarity without the added expense of high-impact durability.
How to Choose the Right Drum Shield for Your Setup
To finalize your decision, align the specific characteristics of each material with your primary usage scenario and venue conditions.
Choose Acrylic if:
- You have a permanent setup: Your drum kit is located in a stationary environment, such as a dedicated house of worship, a recording studio, or a school auditorium where the shield rarely needs to be moved.
- Optical clarity is your top priority: You require maximum visual transparency so the drummer remains clearly visible to the audience and can easily maintain eye contact with other band members.
- You are working with a strict budget: You want to achieve effective high-frequency sound deflection and stage isolation without making a large financial investment.
Choose Polycarbonate if:
- You travel frequently: You are a touring musician, a rental company, or part of a mobile church setup that requires packing, loading, and transporting the shield on a weekly basis.
- You need maximum impact resistance: Your gear is subjected to rough handling, tight stage spaces, or outdoor environments where accidental drops and impacts are highly likely.
- You want a lighter mobile setup: You prefer a slightly lighter panel material to make transport and physical setup less taxing on your crew or yourself.
Verify first if:
- You need to match existing gear: Check the thickness and hinge compatibility of your current hardware to ensure the new panels will fit securely.
- Your venue has specific regulations: Confirm local fire safety standards and venue stage plots, as some public spaces have strict guidelines regarding the use of specific plastic materials near stage lighting and electrical equipment.
Frequently Asked Questions (FAQ)
Do drum shields completely soundproof a drum kit?
No, drum shields do not provide complete soundproofing. They are directional acoustic barriers designed to deflect high-frequency sounds, such as the sharp crack of the snare drum and the bright wash of cymbals, away from the front-of-house microphones and the audience. Low-frequency energy, such as the deep thud of the kick drum and the resonance of the floor tom, easily travels around or passes through the panels because of its longer wavelengths. To achieve comprehensive volume control, you must combine a drum shield with complementary isolation methods, such as heavy drum risers, bass traps, acoustic wall panels, or a fully enclosed drum booth.
How thick should a drum shield panel be for effective isolation?
Most standard drum shields use panels that are 1/4-inch (approximately 6mm) thick, which provides a practical balance between effective sound deflection and manageable weight. Thicker panels, such as 3/8-inch or 1/2-inch, offer better structural stability and slightly improved low-frequency attenuation because of their increased mass, but they also add significant weight to the setup. When selecting panel thickness, you must balance your sound isolation goals against your portability needs and ensure that your existing hinges, clamps, and support stands can safely handle the extra weight without tipping.
Community discussion
Share your experience or ask a question. Comments are reviewed before publication.